Transitioning from UIKit to SwiftUI: A Comprehensive Guide
Oct 23, 2024
SwiftUI has emerged as Apple’s modern declarative framework for building user interfaces. While UIKit has been the cornerstone of iOS development for over a decade, SwiftUI introduces a fresh paradigm that simplifies UI creation and enables dynamic, responsive development. However, transitioning from UIKit to SwiftUI requires strategic planning and understanding. This blog will guide you through the why, what, and how of transitioning from UIKit to SwiftUI, offering actionable advice, code snippets, frequently asked questions, and insights into best practices.
Table of Contents
Why Transition to SwiftUI?
Pros and Cons of Moving to SwiftUI
Strategies for Transitioning
Key Concepts in SwiftUI vs UIKit
Code Snippets: UIKit to SwiftUI Examples
Best Practices for Migration
Resources and Further Reading
Conclusion
FAQs on UIKit to SwiftUI Migration
Why Transition to SwiftUI?
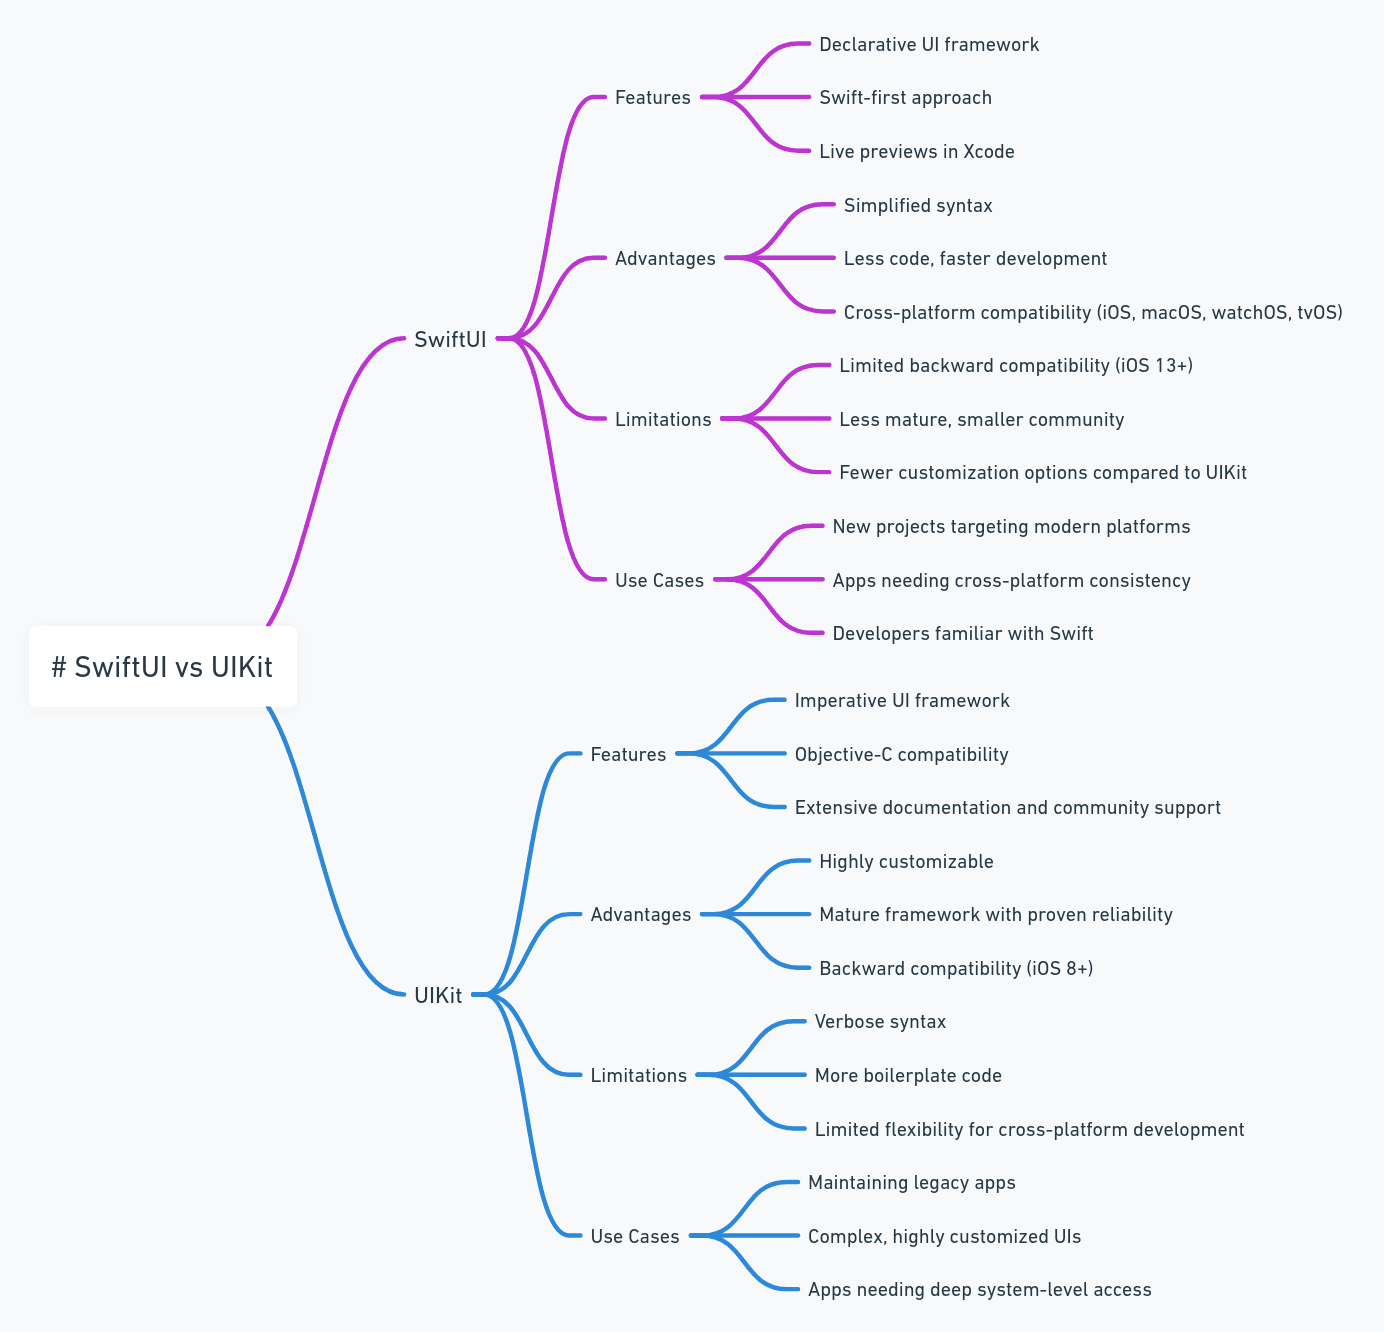
SwiftUI is Apple’s modern framework for building UIs declaratively, making it a strong replacement for UIKit in most new development scenarios. Whether you’re starting fresh or updating an existing app, transitioning to SwiftUI offers benefits like streamlined UI creation, a unified framework for cross-platform development, and future-proofing.
SwiftUI represents Apple’s vision for a more streamlined and unified approach to UI development across its ecosystem. Here’s why developers are increasingly adopting SwiftUI:
1. Declarative Syntax
SwiftUI uses a declarative approach, which simplifies the development process by focusing on what the UI should do instead of how to do it. This leads to cleaner, more concise code.
2. Unified Cross-Platform Development
SwiftUI allows developers to build UIs that work seamlessly across iOS, macOS, watchOS, and tvOS, enabling code reuse and reducing development time.
3. Live Previews
With Xcode’s canvas, SwiftUI provides real-time previews of your UI, dramatically speeding up the iterative design process.
4. Modern and Simplified Animations
SwiftUI makes animations more accessible with its declarative syntax, enabling developers to create smooth and complex animations in a few lines of code.
5. Future-Proofing
SwiftUI is the future of Apple’s UI frameworks. Apple is actively investing in its growth, ensuring it remains relevant for years to come.

Pros and Cons of Moving to SwiftUI
Pros:
Faster Iteration: Declarative syntax and live previews simplify development and reduce debugging time.
Code Readability: SwiftUI’s concise and expressive syntax improves maintainability.
Unified Framework: Create UIs that work across all Apple platforms.
Simplified State Management: SwiftUI’s @State, @Binding, and @Environment streamline handling state changes.
Modern Animations: Animations are intuitive and seamlessly integrated.
Dynamic UI Updates: With state-driven components, your UI automatically updates when the underlying data changes.
Improved Debugging: Xcode’s previews make it easier to identify layout issues during development.
Reduced Boilerplate Code: Many tasks that require lengthy UIKit code are simplified in SwiftUI.
Additional Cons:
Steep Learning Curve: Developers accustomed to UIKit must adapt to SwiftUI’s declarative paradigm.
Limited Backward Compatibility: SwiftUI supports only iOS 13+ and corresponding OS versions.
Maturity Issues: While SwiftUI is rapidly improving, certain advanced features still rely on UIKit.
Limited Customization: Some advanced customizations are harder to implement in SwiftUI compared to UIKit.
Complex State Management: Managing states in large, complex apps can become tricky without proper architecture.
How to Approach the Migration
Migration from UIKit to SwiftUI doesn’t have to be overwhelming. Here’s how to approach it effectively:
1. Start with New Features
Introduce SwiftUI for new features or modules rather than overhauling the entire project at once. This minimizes risk and provides a smoother learning curve.
2. Embed SwiftUI in UIKit
Leverage UIHostingController to integrate SwiftUI views into an existing UIKit-based app without rewriting the entire app.
3. Gradual Transition
Replace individual UIKit components with SwiftUI equivalents over time, ensuring functionality remains intact throughout the migration.
Strategies for Transitioning
Migrating from UIKit to SwiftUI requires careful planning, especially for large-scale applications. Below are detailed strategies tailored for different scenarios:
1. Greenfield Development
If you’re building a new app or module from scratch, consider using SwiftUI entirely. This eliminates the complexity of mixing frameworks and provides a clean slate for experimenting with SwiftUI’s declarative approach.
Why Choose This?
Future-proof your app with the latest framework.
Avoid retrofitting older codebases.
Challenges:
Requires familiarity with SwiftUI to ensure efficient implementation.
2. Incremental Migration
This approach involves gradually introducing SwiftUI into your existing UIKit app. Start by identifying isolated components or features that can be rewritten in SwiftUI.
Steps:
Identify Candidate Features: Isolated views like settings screens, onboarding flows, or forms are ideal candidates.
Embed SwiftUI in UIKit: Use UIHostingController to embed SwiftUI views within your UIKit app.
Replace UIKit Components Gradually: Over time, replace UIKit components with their SwiftUI equivalents.
Benefits:
Lower risk of introducing bugs.
Allows teams to adopt SwiftUI without abandoning UIKit expertise.
Challenges:
Mixing frameworks can lead to inconsistencies in development style.
3. Side-by-Side Migration
In this strategy, you maintain separate workflows for UIKit and SwiftUI within the same app. Use SwiftUI for newer modules while retaining UIKit for legacy components.
Example Use Case:
A large e-commerce app might keep its UIKit-based product pages intact while introducing a SwiftUI-powered checkout process.
Tools:
UIViewControllerRepresentable: Embed UIKit views in SwiftUI.
Benefits:
Clear separation of old and new frameworks.
Flexible timelines for transitioning components.
Challenges:
Higher maintenance costs due to two frameworks in use.
4. Complete Rewrite
For older apps with a significant amount of technical debt, a complete rewrite in SwiftUI might be the best long-term solution.
Why Choose This?
Ensures full adoption of modern technologies.
Eliminates legacy issues that could hinder development.
Challenges:
Time-intensive and costly.
Requires extensive testing to ensure feature parity.
Key Concepts in SwiftUI vs UIKit
1. Layout System
UIKit: Relies on Auto Layout with constraints.
SwiftUI: Uses declarative stacks like HStack, VStack, and ZStack.
2. Event Handling
UIKit: Uses target-action patterns and delegation.
SwiftUI: Handles events via closures and state bindings.
3. Animation
UIKit: Animations are handled with explicit APIs like UIView.animate.
SwiftUI: Provides a declarative syntax for animations.
Code Snippets: UIKit to SwiftUI Examples
Navigation
Table Views
Best Practices for Migration
Set Clear Goals: Define whether you want a complete transition or a hybrid approach.
Start Small: Test SwiftUI with isolated components before scaling to larger features.
Test Early and Often: Use automated tests to verify functionality during the transition.
Invest in Training: Ensure your team understands SwiftUI’s architecture and state management tools.
Maintain Consistent UX: Avoid creating a fragmented user experience by mixing UIKit and SwiftUI styles carelessly.
Resources and Further Reading
Conclusion
Transitioning from UIKit to SwiftUI is an exciting yet challenging process. Whether you choose a phased approach, complete rewrite, or hybrid strategy, planning and careful execution are key. By leveraging SwiftUI’s powerful features and Apple’s ongoing enhancements, you can build modern, scalable apps with less effort and better user experiences. Begin your journey today—embrace the future of UI development with SwiftUI!
Frequently Asked Questions
1. Can I still use Interface Builder with SwiftUI?
No, SwiftUI does not rely on Interface Builder. Instead, you create views programmatically using SwiftUI’s declarative syntax. Xcode’s canvas offers a visual representation of your SwiftUI views.
2. How do I manage dependencies during migration?
Use feature flags or conditional compilation to maintain compatibility with UIKit and SwiftUI during the transition. For example:
3. What are the common pitfalls when migrating?
State Overload: Improper management of
@Stateand@Bindingcan lead to confusing behaviors.Performance Issues: Inefficient use of modifiers like
.onAppearcan impact performance in SwiftUI.UI Inconsistencies: Mixing UIKit and SwiftUI without a clear plan may result in disjointed user experiences.
4. How do I handle advanced gestures in SwiftUI?
SwiftUI simplifies basic gestures but lacks some of UIKit’s advanced gesture capabilities. For complex gestures, consider using UIViewRepresentable to wrap UIKit gesture recognizers.
5. What is the best architecture for SwiftUI apps?
The Model-View-ViewModel (MVVM) pattern is highly recommended. It complements SwiftUI’s declarative nature and state-driven design.
6. How do I debug SwiftUI views effectively?
Use Xcode’s live previews to catch layout issues early.
Employ breakpoints and the debug hierarchy for runtime issues.
Use the .debugDescription property on views for additional insights.
7. Will migrating to SwiftUI increase app size?
Not significantly. SwiftUI is optimized for efficiency and shares many runtime components with UIKit. However, embedding both frameworks during a transitional phase may temporarily increase app size.
8. How do I ensure feature parity during migration?
Prioritize user-critical features and use unit/UI tests to ensure parity. For advanced components that SwiftUI cannot handle, rely on UIKit as a fallback.
9. What’s the best approach for handling animations during migration?
While SwiftUI’s animation system is intuitive, retain UIKit’s animation APIs for highly customized transitions or advanced effects.
10. Can I use SwiftUI for watchOS or macOS apps?
Yes, SwiftUI is designed to work seamlessly across all Apple platforms, making it an excellent choice for shared UI logic and design.
11. Is SwiftUI suitable for large-scale projects?
Yes, especially if your app targets iOS 13+ and later. While SwiftUI is still maturing, it can handle complex use cases with the right architecture.
12. Can UIKit and SwiftUI coexist in the same project?
Absolutely. UIHostingController allows embedding SwiftUI views in UIKit, and UIViewControllerRepresentable enables embedding UIKit views in SwiftUI.
13. What should I prioritize when transitioning?
Focus on reusable components, new features, and areas where SwiftUI’s declarative nature provides clear benefits, such as forms, lists, or animations.
14. Does SwiftUI support all UIKit features?
Not yet. While SwiftUI covers most common use cases, some advanced functionalities still require UIKit.
15. How can I ensure backward compatibility?
For apps supporting iOS 12 or earlier, maintain UIKit for those versions and integrate SwiftUI for iOS 13+.
16. Is SwiftUI better for performance compared to UIKit?
In many cases, yes. SwiftUI’s layout engine is optimized for modern hardware, and its declarative nature reduces code complexity, which can lead to better performance.
17. How does SwiftUI handle accessibility?
SwiftUI includes built-in accessibility modifiers that simplify the process of making apps accessible.
18. What challenges might I face during migration?
Key challenges include adapting to the declarative style, dealing with limited documentation for niche use cases, and managing state across complex UIs.
19. Should I refactor my entire app to SwiftUI at once?
No, it’s more practical to refactor incrementally, starting with new features or simple components.
